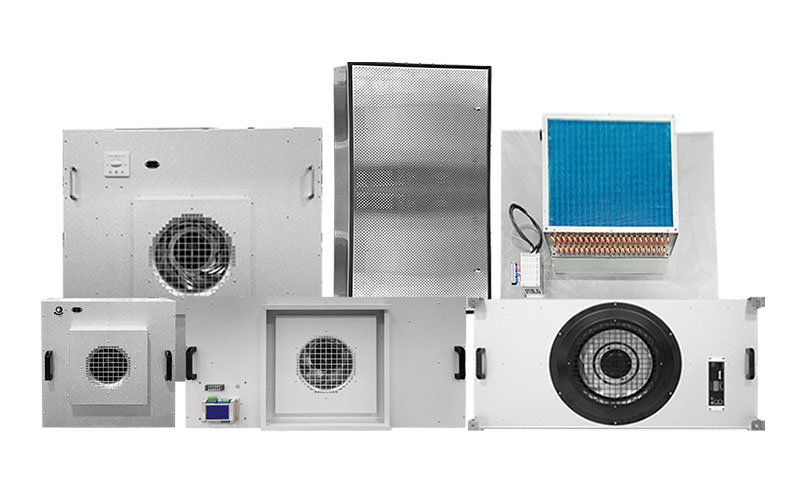
Have you chosen the right Tissue Culture Clean Bench?

What is Plant Tissue Culture lab and a Tissue Culture Laboratory?

1. What is plant tissue culture?

Plant tissue culture is a technique in which excised plant organs, tissues, cells, or protoplasts are cultivated under sterile and artificially controlled environmental conditions using appropriate culture media, allowing them to regenerate cells, tissues, or complete plants. The basis of plant tissue culture is the 'totipotency' of plant cells, meaning that each cell possesses the ability to replicate like Sun Wukong's clones.


Plant tissue culture provides an efficient, convenient, and controllable method for plant production and research. With continuous technological development, it has been widely applied in the conservation of germplasm resources, plant breeding, production of plant secondary metabolites, and plant genetic engineering, achieving remarkable and substantial results.


Through plant tissue culture, a single plant can be propagated into thousands or even tens of thousands of tissue-cultured seedlings. It enables the mass production of clones, preserves superior traits, shortens production cycles, and provides abundant material security for our lives. It has now become the most active and widely applied technology in modern biotechnology.


2. What is a tissue culture laboratory?

A plant tissue culture laboratory is a specialized facility for conducting plant tissue culture experiments. Through plant tissue culture techniques, it is possible to artificially control environmental conditions in the laboratory, simulating the growth processes of plants in nature, thereby achieving goals such as rapid propagation, variety improvement, and genetic transformation.


Plant tissue culture is carried out under strictly sterile conditions, so it requires equipment such as a Clean Bench, electronic analytical balance, precision pipette, autoclave, stereomicroscope, light-incubation chamber, biochemical incubator, air conditioner, and refrigerator.

How to Properly Choose a Clean Bench


How to Properly Choose a Clean Bench?

A Clean Bench is a purification device that provides a locally high-cleanliness working environment with strong versatility. Selecting a good Clean Bench is the first step to ensure sterile operations. It not only provides a sterile environment for laboratory personnel but also effectively prevents cross-contamination, allowing instruments to better serve as facilitators for experiments.


Clean Benches can be divided Horizontal Flow and Vertical Flow types based on airflow patterns. Horizontal laminar flow clean bench offer an open operation space, while vertica flow workbenches typically come with movable glass front windows. Users can choose according to their needs.


High-quality materials and scientific design are the first steps toward sterile culture. Clean Benches should use high-quality steel plates with electrostatic powder coating, and the work surface should be made entirely of stainless steel 304. The work area should be equipped with LED lighting and a UV sterilization system, built-in backup waterproof sockets, and optional glass side windows for easy observation. Options are available for single or dual-person operation.


Creating a high-cleanliness working environment and a Class 100 clean space is the core function of a Clean Bench as a key device for sterile operations. It should include a built-in adjustable air volume fan system, horizontal or vertical uniform airflow, and a high-efficiency filter made of ultra-fine glass fiber paper, achieving a filtration efficiency of ≥99.99% (@0.3μm).


High safety performance standards are an important guarantee for sterile culture. The workbench should include built-in mechanical protection devices, interlocks for lighting and sterilization systems, and the sterilization system can only be activated when the sliding door is fully closed. When the UV lamp is on, opening the movable front window will automatically turn off the UV lamp. Optional delayed switches and programmed timing functions for the sterilization system improve efficiency while ensuring user safety.


A user-friendly interface is the choice for digital upgrades and better empowers sterile operations. The standard controller comes with an embedded LCD display that can show the device's operating status in real time, such as wind speed, lighting, sterilization, and filter lifespan, and provides multiple audible and visual alarm functions for various faults.

Negative pressure control in ICU wards The ingenious reverse application of HEPA Box

In the ICU wards of hospitals, negative pressure control is a crucial technology, acting as an invisible barrier to protect the safety of medical staff and patients. Behind this barrier, the seamless coordination of efficient air supply and exhaust systems, along with sealing mechanisms to prevent virus leakage , together enact a battle between technology and the virus.


The principle of negative pressure control

The core principle of a negative pressure environment is to maintain an indoor air pressure lower than that of adjacent areas. When the ward door is closed, air automatically flows from the corridor (positive pressure zone) to the ward (negative pressure zone) due to the pressure difference, while contaminated air inside the ward cannot escape. This tiny pressure difference (usually -5Pa to -15Pa), though imperceptible, can effectively curb the spread of viruses .


High-efficiency air supply outlets and exhaust systems working together

In negative pressure wards, HEPA Box and exhaust systems play different roles, but together they maintain the stability of the negative pressure environment.


Air Filtration Equipment HEPA Box


 HEPA Box : These are responsible for delivering fresh air that has undergone three stages of filtration—coarse, medium, and high efficiency—into the patient rooms. This fresh air is purified at each stage before entering the rooms, ensuring the cleanliness of the supplied air. The air supply outlets are typically located at the top of the room, allowing clean air to flow first through the breathing area of medical staff, then through the patient area, and finally be captured by the exhaust vents.

 Exhaust system : It is the "heart" of the negative pressure environment. The exhaust fan runs continuously, drawing out contaminated air from the ward and discharging it at high altitude after high-efficiency filtration and disinfection. The exhaust vents are usually located near the head of the bed for convenient and rapid removal of contaminated air.

This "upward delivery and downward exhaust" airflow organization method creates a directional airflow, which allows polluted air to be quickly captured and discharged after it is generated, avoiding its stagnation and spread in the ward.


Sealing logic to prevent virus leakage

The ingenious "reverse application" of high-efficiency air outlets lies in the fact that they don't simply "send air," but rather, through precise control of the airflow, work in conjunction with the exhaust system to construct a tightly sealed system. The logic behind this system is:

 Airflow balance : The exhaust air volume must always be greater than the supply air volume; this is fundamental to maintaining negative pressure. By precisely adjusting the airflow of the supply and exhaust fans, the ward is kept under negative pressure at all times.

 High-efficiency filtration : Both the supply and exhaust air undergo high-efficiency filtration. The three-stage filtration of the supply air ensures that the air entering the ward is clean; the high-efficiency filtration of the exhaust air ensures that the exhausted air will not become a new source of pollution.

 Pressure gradient : The pressure difference decreases sequentially from the clean area to the potentially contaminated area and then to the contaminated area, forming a gradient. This gradient design ensures that airflow will move from the clean area to the contaminated area even when doors are open, thus preventing cross-infection.

The negative pressure control system in hospital ICU wards is a perfect combination of modern medicine and engineering technology. The precise coordination of high-efficiency air supply outlets and exhaust systems, along with the sealing logic behind them, together form a solid defense, providing strong technical support for combating infectious diseases.


Plant Tissue Culture and Pharmaceutical Development Why Is Clean Air Crucial?

Clean air plays a crucial role in plant tissue culture and pharmaceutical technology development, and is the core foundation for ensuring experimental success, product quality, and production safety. Although the application scenarios in the two fields are different, their core logic is the same: maintaining a sterile or controlled environment by controlling airborne microbial and particulate pollution.

Here's a breakdown of the role of clean air in these two key areas:


Ⅰ. The key role in plant tissue culture

Plant tissue culture is a technology in which plant explants (such as stem tips, leaves, etc.) are inoculated into artificially prepared medium for culture under sterile conditions. Clean air is the first line of defense against pollution.

1. Reduce microbial contamination rate (core pain point)


The current situation is grim: According to statistics, the microbial contamination rate in plant tissue culture is as high as 15%-40%, of which bacterial contamination accounts for about 80%, followed by fungal contamination. Once contaminated, it will not only lead to the scrapping of the current batch of seedlings, but may also spread to the entire culture room, causing huge economic losses.


Airborne pollution: Airborne fungal spores (e.g., Penicillium, Aspergillus niger) and bacterial spores are the main sources of pollution. If these particles settle on the medium or explant incision, they will multiply rapidly at the right temperature and humidity.


The role of clean air:Blocking the transmission pathway: The high-efficiency air filtration system (HEPA or ULPA) removes particulate matter ≥ 0.3 μm in the air, directly cutting off the aerosol transmission path of fungal spores and bacteria.


Laminar flow clean bench efficiency: In inoculation operations, laminar flow clean benches rely on clean laminar air to form an "air barrier" to protect the operating area from external environmental interference. If the air intake is not clean, even if the wind speed reaches the standard, the sterility effect cannot be guaranteed.


2. Ensure the growth quality and genetic stability of tissue culture seedlings

Hidden pollution prevention and control: Some endophytes or low-concentration microorganisms may not immediately cause turbidity of the culture medium, but they will secrete toxins or compete for nutrients, inhibit plant cell division and differentiation, and lead to slow growth, deformity and even death of tissue culture seedlings. Clean air minimizes this hidden pollution.

Reliability of experimental data: In scientific research experiments, variable interference caused by air pollution can make experimental results irreproducible. The clean environment ensures the accuracy of experimental results, which is especially critical for genetic improvement and genetic engineering research.


3. Optimize environmental control strategies

Dynamic sterility demand: Traditional UV or ozone disinfection has "human-machine separation" limitations and cannot sustain bacterial inhibition. Modern tissue culture rooms are more inclined to use air purification equipment with human-machine coexistence functions to achieve 24-hour planktonic bacteria and settled bacteria to meet the standards and ensure continuous cleanliness.


Ⅱ. The Key Role in Pharmaceutical Technology Development

In the pharmaceutical field, clean air is not only a guarantee for the success of experiments but also a mandatory requirement under laws and regulations (such as GMP), directly affecting drug safety and patient health.


1. Compliance with GMP (Good Manufacturing Practice for Pharmaceutical Products)

Regulatory Requirement: GMP standards worldwide (such as China GMP, EU GMP, and US FDA cGMP) strictly classify the cleanliness of the air in pharmaceutical environments (e.g., Grade A, B, C, D).

Key Indicators: The number of suspended particles and microbiological limits (airborne microorganisms, settled bacteria, surface microorganisms) in the air must be strictly controlled. For example, in aseptic filling areas (Grade A), the number of particles ≥0.5 μm per cubic meter must not exceed 3,520, and no microorganisms should be detected.


2. Ensuring the Safety of Aseptic Preparations

Protection of High-Risk Operations: During the production of aseptic drugs such as injections, vaccines, biological products, and ophthalmic preparations, any airborne particles or microorganisms entering the product may cause severe infection risks or even death.

Prevention of Cross-Contamination: When developing and producing drugs with different active pharmaceutical ingredients (APIs), clean air conditioning systems (HVAC) control air pressure differences and directional airflow to prevent high-activity or sensitizing substances from spreading through the air to other areas, thereby avoiding cross-contamination.


3. Supporting Biotechnology and Cell Therapy Development

Sensitivity of Cell Cultures: In the development of monoclonal antibodies, gene therapy vectors (such as viral vectors), and stem cell therapies, cells are extremely sensitive to the environment. Contamination of cell banks by mycoplasma, viruses, or fungal spores in the air can lead to the failure of an entire R&D project, resulting in losses of millions of dollars.

Process Stability: A clean air environment helps maintain the stability of the surroundings of bioreactors, reducing abnormal cell metabolism due to environmental fluctuations and ensuring batch-to-batch consistency of drugs.


4. Extending Equipment Lifespan and Reducing Downtime

Clean air reduces dust particle deposition inside precision instruments (such as filling machines, lyophilizers, and testing equipment), lowers equipment failure rates, decreases the frequency of cleaning and maintenance, and thereby enhances production efficiency.


Clean air is the lifeline of plant tissue culture and pharmaceutical technology development. In plant tissue culture, it is a key technical means to reduce costs and increase propagation coefficients. In pharmaceutical development, it is the legal baseline for compliant production and safeguarding human health. With technological advancements, the shift from traditional static disinfection to dynamic, real-time, human-machine interactive intelligent air purification solutions has become a common trend for improving competitiveness in both industries.

Storage of high-efficiency filters Don't put tens of thousands of yuan of filter elements into a damp warehouse

In the construction and maintenance of clean rooms, operating rooms or precision electronics workshops, high-efficiency filters (HEPA/ULPA) are undoubtedly the heart of existence. They are expensive, often thousands or even tens of thousands of yuan a piece, and are the last line of defense to ensure environmental cleanliness. However, many managers often only focus on the installation and replacement of filters, but ignore their state before "work" - storage.


klc hepa filter


Randomly stacking expensive high-efficiency filters in the corners of damp, cold warehouses is tantamount to a "death sentence" before they are put into use. This will not only lead to moisture and mold in the filter media and aging of seals, but may also cause leaks after installation, causing huge economic losses and safety hazards. Today, we're going to talk about two of the deadliest and most overlooked details of HEPA storage: moisture-proof packaging and vertical placement.


I. Moisture-proof packaging: the "golden bell" that guards the filter element

The core filter material of a HEPA filter is usually ultra-fine fiberglass paper, which is extremely hygroscopic. Once damp, not only will the filtration efficiency plummet, but what is even more frightening is that it will become a breeding ground for bacteria and mold. During cleanroom operation, these mold spores will spread with the airflow, causing serious secondary pollution.

Therefore, the original packaging is the best umbrella for filters.


klc company


1. Keep the factory seal:

The vast majority of high-efficiency filters produced by regular manufacturers will be sealed and packaged in plastic bags when they leave the factory, and are equipped with moisture-proof paper or cardboard corner guards. As long as the filter is not installed, this layer of packaging must not be removed. This layer of packaging is not only dustproof, but also a barrier to moisture in the air.

2. Secondary protection:

If you are in a warehouse with high humidity, the original packaging alone may not be enough. It is recommended to cover the original packaging with a thick PE plastic bag and put an appropriate amount of color-changing silicone desiccant.

3. Inspection of damage:

During the handling or inspection process, if the outer packaging is found to be damaged, the inside of the filter must be checked immediately. If there are signs of moisture, the performance must be re-tested and never installed directly.

Remember, don't let the filter "run naked". Any exposure to humid air is an overdraft filter life.


II. Vertical placement: avoid irreversible physical damage

In addition to moisture resistance, the posture of the filter is also a matter of life and death. In order to save space, many warehouses are accustomed to stacking filters flat like books, or leaning against the wall at will, which is extremely wrong.

The HEPA filter must be placed vertically (upright).

1. Prevent filter media deformation:

The filter paper of high-efficiency filters is very delicate and folded. If stacked flat for a long time, the filter at the bottom will be subjected to tremendous pressure, causing the filter paper to deform or even break. Once the filter paper is damaged, its filtration efficiency will be reduced to zero, and the damage is irreparable.

2. Avoid damage to the sealant:

The filter border is often coated with a sealant (such as polyurethane or silicone). Long-term flat pressure will cause plastic deformation of the sealant, and it cannot fit closely with the ceiling or equipment during installation, resulting in gaps and air leakage.

3. Stacking Height Limitations:

Even when placed vertically, stacking cannot be done indefinitely. Generally, the stacking height should not exceed 2 meters (or follow the indications on the packaging box). Excessive stacking not only increases the risk of tipping over, but the filters at the bottom are also prone to frame damage due to excessive pressure.

The correct practice is: place the filters upright on pallets or shelves, following the direction indicated by the “up” arrows on the packaging box. If conditions allow, it is best to use dedicated racks to prevent direct contact with the ground, further isolating the filters from ground moisture.


III. Environmental Control and “First In, First Out”

In addition to the above points, the choice of storage environment is also crucial.

• Temperature and humidity control:

The ideal storage temperature should be between 0℃ and 40℃, and the relative humidity should preferably be kept below 60%. Avoid storing filters in places with drastic temperature changes to prevent condensation.

• Keep away from sources of contamination:

Warehouses should be kept clean, away from acidic or alkaline chemicals, dust sources, and corrosive gases.

• First In, First Out principle:

High-efficiency filters also have a “shelf life.” It is generally recommended that storage should not exceed one year (for filters with adhesive seals, it is even suggested not to exceed two months). Therefore, when using the filters, it is essential to follow the “first in, first out” principle, giving priority to products with earlier storage dates to avoid inventory accumulation leading to expiration and ineffectiveness.


High-efficiency filters are sophisticated industrial products, not simple construction materials. By handling them with extra care, you ensure greater security for your project. Do not let your high-value filters deteriorate prematurely in a damp, dark warehouse. Use proper moisture-proof packaging, maintain vertical placement, and ensure that each filter can operate at its optimal condition to protect clean spaces.

The "Invisible Defense" in the Operating Room A Review of Four Types of Air Filters in Clean Operating Rooms

In the hallowed halls of modern medicine, clean operating rooms are the last physical barrier protecting patients' lives. While we marvel at the advanced surgical techniques, we often overlook the air purification system that works tirelessly day and night overhead. This system is like the "respiratory system" of the operating room, and its core component---the air filter---is the "invisible defense" against bacteria and dust.


Primary filter: The vanguard in the battle.

The primary filter (pre-filter) is the first line of defense in an air purification system, typically installed at the fresh air inlet or mixing section of an air handling unit (AHU). Its role is like that of a strong and capable "vanguard," responsible for intercepting those visible "large" enemies in the air.


These filters are primarily made of non-woven fabric (synthetic fiber), metal mesh (stainless steel mesh), or nylon mesh, and have a relatively coarse structure. Their main task is to capture particles larger than 5 micrometers in diameter, such as airborne hair, lint, pollen, and large dust particles. Without the effective interception of the primary filter, these impurities will quickly clog subsequent, more sophisticated filtration devices. Therefore, primary filters require the most frequent maintenance, typically needing to be replaced every 1 to 2 months, or cleaned promptly when dust accumulation is severe to ensure sufficient fresh airflow.


Medium-efficiency filter: the "backbone" bridging the gap between upstream and downstream applications.

Although the air that has passed through the primary filter removes large particles, it still contains many fine dust particles and microorganisms. This is where the medium-efficiency filter (medium filter) comes in. Located after the primary filter and before the high-efficiency filter, it plays a crucial role in bridging the gap between the two.


Medium-efficiency filters typically employ a bag-type structure (pocket filter), filled internally with glass fiber or synthetic fiber, with a denser fiber arrangement. They effectively capture particles with diameters between 1 and 5 micrometers, such as fine dust, smoke, and some bacterial carriers. As the "backbone" of the system, medium-efficiency filters not only further purify the air, but more importantly, they protect the expensive high-efficiency filters at the end, preventing premature clogging. Generally, medium-efficiency filters should be replaced every 3 to 6 months, making them a crucial element in maintaining stable system operation.


High-efficiency air filters (HEPA) filters: the ultimate gatekeeper for victory.

If the first two stages of filtration are the foundation, then the high-efficiency air filters (HEPA ) is the "ultimate arbiter" of air quality in a clean operating room. It is usually installed at the air supply terminal in the ceiling of the operating room (ceiling HEPA) and is the last barrier before the air enters the surgical area.


HEPA filters are made of countless extremely fine glass fibers folded together, forming intricate nanoscale channels. They boast a filtration efficiency of over 99.97% for particles with a diameter of 0.3 micrometers or larger (including the vast majority of bacteria, viruses, and dust). This barrier ensures that the air delivered to the operating table is nearly sterile, significantly reducing the risk of postoperative infection. HEPA filters have a long lifespan, typically lasting more than 3 years, but require regular resistance testing (pressure drop test). Once the resistance exceeds 160% of the initial resistance, the filter must be replaced immediately.

Sub-HEPA filters: "Elite guardians" for specific scenarios.

In areas where cleanliness requirements are slightly lower than Class 100 or Class 1000 operating rooms, or as a pre-filter for HEPA systems, Sub-HEPA filters (Sub high efficiency air filter) play a unique role. Their filtration efficiency falls between medium and high efficiency, primarily targeting particles larger than 0.5 micrometers in diameter, with filtration efficiencies ranging from 95% to 99.9%.

Sub-HEPA filters are compact in structure and have moderate resistance, and are commonly used in Class III and IV clean operating rooms or clean auxiliary rooms. Like an "elite guardian," while not as stringent as HEPA filters, they are sufficient to meet the aseptic requirements of general surgeries. They are also often used as pre-filters in HEPA systems to further extend the lifespan of the final filter.

From the coarse primary filter to the precise HEPA filter, these four stages of filters work in tandem to construct a comprehensive air purification network. Though hidden in ceilings and machine rooms, working silently, they are an indispensable cornerstone of the modern medical safety system. Regular maintenance and scientific management of these "invisible defenses" safeguard the life and health of every patient.

What are the key technical points for the construction of a cleanroom for lithium batteries?

In recent years, with the rapid development of the new energy electric vehicle industry, lithium batteries, as the core power source, have seen continuously increasing production demand, which in turn has driven the large-scale expansion of battery manufacturing enterprises and significantly heightened the demand for high-standard lithium battery cleanroom construction.

An in-depth analysis of the key technical points in the construction of new energy lithium battery cleanrooms:

 Equipment for Lithium Battery Plants


01 Division of Clean Areas in Lithium Battery Cleanrooms
Cleanrooms are usually divided into different grade areas according to cleanliness requirements to achieve precise control over airborne particles, microorganisms, and other contaminants.
Clean Area: This area has the strictest requirements for air quality, particle concentration, and microbial count. High-efficiency air filters (HEPA or ULPA) must be used, positive pressure (or negative pressure under specific process requirements) must be maintained, and personnel are required to wear protective clothing such as cleanroom suits.
Semi-Clean Area: The cleanliness standard is slightly lower than that of the clean area but still requires effective control of airborne particles and microorganisms. Generally, high-efficiency air filtration systems are installed and personnel are required to wear cleanroom suits.
Partially Clean Area: The control over particle counts is relatively relaxed but still needs to remain within the acceptable range for the process. Standard air filters with basic cleanroom attire are usually sufficient.
Non-Clean Area: The cleanliness requirements are the lowest, with no special air filtration equipment or professional cleanroom clothing needed. This area is mainly used for auxiliary or non-critical work areas.

 cleanroom for lithium battery


02. Lithium Battery Cleanroom Air Conditioning Treatment System
To ensure the stability and cleanliness of the production environment, the cleanroom must be equipped with a comprehensive air treatment system, including air purification devices, supply and return air equipment, and temperature and humidity control systems. Among them, air purification equipment generally uses High-Efficiency (HEPA) or Ultra-Low Penetration Air (ULPA) filters, which can efficiently remove airborne particles, microorganisms, and harmful gases; the fans and air conditioning systems work in coordination to ensure that the temperature, humidity, and airflow organization in the cleanroom always remain at the optimal state required by the process.


03 Interior Installation of Lithium Battery Cleanrooms
The interior finishing materials of cleanrooms need to balance functionality with cleanliness maintenance requirements, focusing on ease of cleaning, anti-static performance, and corrosion resistance.
Flooring Materials: Common choices include conductive floors, anti-static epoxy floors, or high-durability anti-static PVC floors, which can effectively dissipate static electricity and facilitate routine cleaning.
Wall Materials: It is recommended to use stainless steel panels, acid- and alkali-resistant coatings, or other corrosion-resistant, smooth, seamless finishing materials to minimize dust accumulation in corners.
Special Function Areas: High-temperature rooms are usually independently isolated, with enclosures made of rock wool sandwich panels and doors equipped with fireproof doors. Low-humidity areas use rock wool partition walls and glass magnesium rock wool ceilings, paired with sealed molded doors and double-layer vacuum glass windows to enhance sealing and thermal insulation performance.


04 Lithium Battery Cleanroom Lighting System

Lighting design should take into account functionality, cleanliness, and energy efficiency:
The workshop should provide a uniform and bright lighting environment to avoid shadows that may interfere with precision operations;Lighting fixtures must be designed to be dust-free, with smooth surfaces and no seams, to prevent dust adhesion and accumulation;
High-energy-efficiency LED fixtures should be preferred, significantly reducing energy consumption and operation and maintenance costs while ensuring adequate illumination.


klc cleanroom


05 Personnel Movement and Protective Measures in Lithium Battery Cleanrooms
Personnel are one of the main sources of contamination in cleanrooms; therefore, it is essential to scientifically plan pedestrian flow channels and implement strict access management and behavioral standards:
Establish reasonable changing rooms, air showers, and buffer zones to achieve effective separation of personnel flow and material flow;
All personnel entering the clean area must receive professional training to master cleanroom behavioral guidelines, protective equipment wearing standards, and emergency response procedures;
Through institutionalized management and regular assessments, continuously enhance employees' awareness of cleanliness and operational proficiency, ensuring the cleanliness and stability of the production environment from the source.

When the Air Is 'Purified' to the Extreme Unveiling the Hardcore Technology Behind Cleanrooms

Walking into a modern semiconductor wafer fabrication plant or a high-end biopharmaceutical workshop, one is greeted by fully equipped engineers, precisely maneuvering robotic arms, and an almost 'vacuum-like' clean environment. The low hum of the air purification system seems to tell a story of humanity's relentless pursuit of absolute cleanliness. This is the cleanroom—the cornerstone of modern high-end manufacturing.


Cleanroom: A Micron-Level Industrial Fortress

A cleanroom, also known as a controlled environment room, is not simply a room that is cleaned physically, but a controlled environment created through precise engineering methods. Its core lies in controlling airborne dust particles, microorganisms, harmful gases, and other contaminants to extremely low concentration levels to meet the stringent requirements of specific manufacturing processes.


• Micron-level cleanliness standards: The cleanliness of a cleanroom follows international standards (such as ISO 14644-1), with levels ranging from ISO Class 1 (highest) to ISO Class 9. For example, in an ISO Class 5 cleanroom (equivalent to the former "Class 100" standard), the number of particles larger than 0.5 microns per cubic meter of air must not exceed 3,520. In contrast, the quantity of particles in the air of an ordinary urban environment can reach several million. In the field of chip manufacturing, when line widths enter the 3-nanometer era, even the tiniest dust particle can become a "lethal killer" causing product defects.


• Comprehensive control beyond cleanliness: In addition to particulate matter, a cleanroom must precisely control temperature, humidity, pressure differential, static electricity, and even vibration. For instance, semiconductor photolithography areas require temperature fluctuations to be controlled within ±0.1°C to prevent misalignment caused by thermal expansion and contraction; simultaneously, maintaining positive pressure inside the cleanroom can effectively prevent unfiltered dirty air from entering.


Core of the Design: Building a "Zero-Pollution" Ecosystem

The design goal of a cleanroom goes far beyond simply "filtering the air"; it is about creating a dynamic ecosystem capable of continuously resisting and eliminating contamination. The core design principles are reflected in the following aspects:


• The Art of Airflow Organization: Airflow is the "blood" of a cleanroom. Designers use Computational Fluid Dynamics (CFD) simulations to optimize airflow paths, ensuring that clean air evenly "washes" the entire work area and rapidly removes contaminants. In the highest-grade clean areas, vertical unidirectional (laminar) flow is typically used, with clean air flowing from top to bottom like an "air piston" to remove pollutants with maximum efficiency.


• Sealing of Building Structures: The walls, ceilings, and floors of the workshop form the "skin" of the clean space. All materials must be smooth, non-dusting, dust-resistant, and corrosion-resistant, such as color steel panels, stainless steel sheets, and epoxy self-leveling floors. All joints require rounded treatments and reliable sealing, and all pipelines must be concealed to eliminate any dead corners where dirt could accumulate.


• Intelligent Dynamic Monitoring: Modern cleanrooms are a "smart living entity." By deploying laser particle counters, temperature and humidity sensors, and differential pressure meters, combined with a Building Management System (BMS), real-time 24/7 monitoring and automatic adjustment of environmental parameters can be achieved, ensuring that any minor anomalies are detected and addressed immediately.


Core Weapon: The 'Skynet' Built by Multi-Stage Filtration Equipment

The key to achieving ultimate purification lies in a meticulously coordinated filtration equipment system, which functions like the 'super lungs' of a workshop, providing multiple layers of protection to ensure clean air.


• Primary and Medium Efficiency Filters (Pre-Filtration): This is the first line of defense in an air purification system. The primary filter (such as G4 grade) intercepts large particles above 5 microns, including dust and hair; the medium efficiency filter (such as F8 grade) further captures medium particles between 1–5 microns. Their main purpose is to protect the terminal high-efficiency filters and extend their service life.


• High-Efficiency/Ultra-High-Efficiency Filters (HEPA/ULPA): This is the 'heart' of a cleanroom. High-Efficiency Particulate Air (HEPA) filters can capture 99.97% of particles as small as 0.3 microns, while the more advanced Ultra-Low Penetration Air (ULPA) filters can capture even smaller particles. Installed at the end of the air supply system (such as in Fan Filter Unit (FFU), they are the final assurance that the air delivered to the cleanroom meets the required cleanliness level.


• Chemical Filters (AMC Control): In cutting-edge industries like semiconductors, controlling only particulate matter is far from sufficient. Gaseous molecular pollutants (AMC), such as acids and bases generated during processing, are equally critical. Chemical filters filled with activated carbon or other specialized media selectively adsorb these molecular-level pollutants, providing more comprehensive protection for the production process.


When air is purified to its extreme, it is no longer ordinary air but a special medium that carries the highest precision and strictest standards of modern industry. From the smartphones in our hands to life-saving vaccines, cleanrooms, with their 'invisible precision,' silently support the 'visible heights' of human technological civilization.

Step-by-Step Guide to Using a Projection Vein Finder

You can do better at venipuncture by using a projection vein finder. This tool shows a live map of veins on the skin. It helps you pick the best place to put the needle.

  • Automated devices work 87% of the time.

  • For people with easy veins, success goes up to 97%. Manual methods work about 90% of the time.

  • For hard veins, old ways only work 60% of the time.

Metric

Traditional Methods

Projection Vein Finder

First-attempt success rate

46.8%

87.1%

Patient discomfort

Higher

Lower

Procedure time

Longer

Shorter

You help patients feel safe and calm. You also make your job simpler.


Key Takeaways

  • A projection vein finder helps nurses find veins faster. It lets them get it right the first time 87% of the time. This makes venipuncture easier and hurts less for patients.

  • You must set up the device the right way. The patient also needs to be in the right spot. This helps you see the veins clearly. It also helps the procedure go well.

  • Using a projection vein finder saves time. It makes patients feel less pain. This makes things better for both nurses and patients.

  • Practice and training with the device help you get better. You will do a better job and feel more sure of yourself during venipuncture.

  • Always take care of the patient after the procedure. This helps them heal and lets you watch for any problems.


What Is a Projection Vein Finder?


Device Function and Technology

A projection vein finder lets you see veins under your skin with special light. It uses near-infrared light that shines on your skin. The blood in your veins absorbs this light. This makes the veins look like dark lines. It is easier to find where to put the needle. Some devices, like AccuVein, use strong near-infrared LEDs. They also have a digital projector. This shows a live picture of your veins right on your skin.

  • A projection vein finder uses infrared light to show veins on your skin.

  • Other devices, called transilluminators, shine light through your skin. These do not project images.

  • Herbert Zeman invented the first device like this in 1995.

  • Most devices use near-infrared light. Hemoglobin in your blood absorbs this light, so veins are easy to see.

There are different kinds of projection vein finders. Some are small and you can hold them in your hand. Others are bigger and stay in hospitals. This technology helps you see veins clearly, even if they are hard to find.


Benefits for Venipuncture

A projection vein finder gives you many good things during venipuncture. You can see veins as you work. This helps you pick the best spot for the needle. You will have fewer misses and your patients will feel less pain.

Outcome

Vein-Viewing Device

Traditional Techniques

Statistical Significance

Number of Cannulation Attempts

Reduced

Higher

Significant

Time Taken for Cannulation

Reduced

Longer

Significant

Pain Score

Minimal Effect

Comparable

Not Significant

Fear Score

Lower

Comparable

Not Significant

Nurses like to use these devices for kids. It makes the process faster and more comfortable. Patients feel less scared and have less pain. The device also helps you finish your work faster. You do not need as much time for each procedure.

Tip: Using a V800P infrared projection vein finder device can help you get the needle in the vein on the first try. It also helps your patients feel calm.


Projection Vein Finder Setup

Projection Vein Finder: V800F


Preparing Supplies

Before you start, gather all the supplies you need. You should have your projection vein finder, disinfectant wipes, a tourniquet, gloves, and an alcohol swab. Make sure your device has enough battery power. If your device uses rechargeable batteries, check the charge level. Clean the device with a disinfectant wipe to keep it free from germs. Place all your supplies within easy reach. Ask your patient to remove any bulky clothing or jewelry from the area you will scan. Good preparation helps you work faster and keeps your patient comfortable.

Tip: Always support the patient’s arm with a pillow. This keeps the arm steady and makes veins easier to find.


Device Positioning and Focusing

You want to see the veins as clearly as possible. Follow these steps to set up your device:

  1. Press and hold the power button for three seconds to turn on the device.

  2. Hold the device 6 to 10 inches above the patient’s skin. This distance gives you the best view of the veins.

  3. Adjust the room lighting if needed. Dim lights can help the veins show up better.

  4. Use the mode button to switch between display settings. Choose the one that makes the veins stand out.

  5. Apply a tourniquet above the site to make the veins more visible.

  6. Calibrate the device if your model requires it. Some devices, like HelloVein Lite 2.0 and AimVein, come factory calibrated and need only basic cleaning.

  7. Move the device slowly until you see a clear image of the vein on the skin.

Feature

HelloVein Lite 2.0

AimVein

Calibration

No calibration required

Factory calibrated

Maintenance

Basic cleaning only

Gentle cleaning recommended

Ready to Use

Yes

Yes

Battery

Rechargeable

Rechargeable

Check the image for sharpness. If the veins look blurry, adjust the height or angle of the device. Mark the best vein for insertion. Clean the area with an alcohol swab before you start the procedure.

Note: Wipe the device with a soft cloth or medical-grade disinfectant after each use to keep it clean and ready for the next patient.


Patient Positioning


Best Way to Place the Patient

You need to put your patient in the right spot. This helps you see their veins better. It also makes using the projection vein finder easier. The whole process will go smoother for you and your patient. Here are some tips for different places you might need to access:

  • Put the patient in a comfy chair or on a table. Make sure their arm or leg is resting and not tense.

  • If you need arm veins, ask the patient to stretch their arm out flat. Use a pillow or towel to keep the arm from moving.

  • For internal jugular or subclavian veins, use the Trendelenburg position. Lower the bed so the head is below the heart. This fills the veins and lowers the chance of air bubbles.

  • For femoral veins, have the patient lie flat on their back. This makes it easier to find and reach the femoral vein.

  • Take off any tight clothes or jewelry from the area you will scan.

Tip: Always make sure the patient feels okay and calm before you start. When the patient is relaxed, it is easier to find veins.


Fixing Position Problems

Sometimes, it is hard to get the patient in the right spot or find a vein. Use this table to help with common problems:

Issue

Solution

Inability to locate hidden veins

Move slowly and feel for the vein. Try a smaller needle or butterfly needle. Ask the patient where their best veins are.

Anxiety Management

Tell the patient what you are doing. Help them feel safe. Ask them to take deep breaths. Stay calm yourself.

Minimizing Pain and Discomfort

Use the right angle for the needle. Warm the skin to make veins bigger. Distract the patient if needed.

Management of Blood Flow Issues

Move the needle gently. If a vein collapses, let go of the tourniquet. Ask the patient to drink water.

Positioning the Patient’s Arm

Rest the arm flat and keep it straight.

Note: If you cannot find a good vein, try moving the arm or leg a little. You can also ask the patient to squeeze their hand into a fist. A small change can help you see the vein better.


Using the Projection Vein Finder


Locating Veins

You can find veins quickly and safely with a vivolight projection vein finder V800. Follow these steps to get the best results:

  1. Confirm the patient’s identity and ask if they have had any problems with needles before.

  2. Place a tourniquet above the spot where you plan to insert the needle. Ask the patient to make a fist to help the veins stand out.

  3. Clean the area with an alcohol swab to lower the risk of infection.

  4. Turn on the projection vein finder and move it over the skin. Watch for the dark lines that show the veins.

  5. Adjust the device settings if you need a clearer view.

  6. When you find a good vein, turn off the device before you insert the needle.

  7. After you finish, release the tourniquet and press on the site to stop any bleeding.

Tip: You can usually find a vein in about 3.4 minutes with a projection vein finder. This is much faster than the 6.06 minutes it takes with traditional methods.


Adjusting Device Angle and Height

You need to set the device at the right angle and height to see the veins clearly. Many devices let you change the position in several ways. Use the table below to learn what each part does:

Component

Function

Support Structure

Lets you move the device in six directions

Cameras (C1, C2)

Help you rotate the device

NIR Rings of LEDs

Allow you to move the device up, down, or sideways

Color Micro Projector

Lets you change the height and rotation

Hand Rail

Gives you control while you adjust the device

If the veins look blurry, try moving the device closer or farther away. You can also tilt it a little to get a sharper image. Practice helps you get better at finding the right angle.

Note: Some people make mistakes when using the device. You might not get enough practice or may not know how to read the images. Clinics can help by offering workshops or online lessons. Training helps you use the device well and care for your patients.


Venipuncture Steps

Projection Vein Finder: V800P


Selecting the Vein

You want to choose the best vein for venipuncture. The right choice helps you avoid problems and makes the process smoother for your patient. The projection vein finder gives you a clear image of the veins under the skin. You can see which vein is large, straight, and easy to reach. The device uses near-infrared light, so you can spot veins even if they are hard to see with your eyes.

Here is a table to help you pick the best vein:

Vein Type

Characteristics

Median Cubital Vein

Best choice, well anchored, large and prominent, serves as a branching point.

Cephalic Vein

Located on the outer thumb side, second choice for venipuncture.

Basilic Vein

Found on the inner little finger side, considered last choice for venipuncture.

You should look for veins that are straight and do not roll when you touch them. Try to avoid veins that are close to arteries or nerves. The device lets you adjust brightness and color, so you can see veins on different skin tones. You can find the best vein quickly and with more accuracy.

Tip: Ask your patient if they have a preferred spot for blood draws. Some people know which veins work best for them.


Performing Venipuncture

You can start the procedure once you have chosen the vein. Follow these steps for a safe and smooth venipuncture:

  1. Put on gloves and clean the area with an alcohol swab.

  2. Place a tourniquet above the site to make the vein stand out.

  3. Use the projection vein finder to check the vein one more time.

  4. Hold the skin tight below the vein to keep it from moving.

  5. Insert the needle at a 15 to 30-degree angle with the bevel facing up.

  6. Watch for blood to appear in the needle hub. This means you are in the vein.

  7. Remove the tourniquet before you take out the needle.

  8. Pull the needle out gently and press on the site with a clean gauze pad.

You can finish the procedure faster because you see the vein in real time. The device helps you avoid extra needle sticks. Patients feel less pain and have a better experience. You also lower the risk of problems like hematoma or infiltration. The table below shows how technology can help you:

Evidence Type

Description

Complication Reduction

VeinViewer technology can help avoid complications such as hematoma and infiltration during venipuncture.

Visualization Benefits

Enhances visualization of veins, leading to increased first-stick success rates.

Patient Experience

Improves patient comfort and satisfaction by reducing pain and potential tissue damage.

Note: Always check for signs of swelling or pain during the procedure. If you see these signs, stop and try a different vein.


Post-Procedure Care

You need to care for the site after venipuncture to keep your patient safe. Press on the site for at least 30 seconds to stop bleeding. Cover the area with a clean bandage. Tell your patient to keep the bandage on for at least 15 minutes.

Check the site for redness, swelling, or bruising. Ask your patient if they feel pain or numbness. If you see any problems, let a nurse or doctor know right away.

Here are some quick tips for post-procedure care:

  • Remind your patient to avoid heavy lifting with the arm for a few hours.

  • Tell them to watch for signs of infection, like redness or warmth.

  • Advise them to drink water to help their body recover.

Tip: Good post-procedure care helps your patient heal faster and lowers the chance of problems.

You can use these steps to make venipuncture safe and comfortable. Practice helps you get better and more confident each time.


You can make venipuncture safer and easier by using a projection vein finder for each step. When you practice, you get better at using the device. This helps you feel sure of yourself. Research shows you are more likely to get the vein on the first try. Patients also feel less pain.

Metric

Vein Finder Group

Traditional Group

Pain Scores (mean NIPS)

5.75

6.83

Crying Duration (minutes)

2.94

5.61

First-Attempt Success Rate

87.1%

46.8%

  • You can see veins better and finish the job faster.

  • Training classes and online videos help you learn how to use the device.

  • Experts say these devices should be used for better results.

Keep practicing and learning so you can give your patients the best care.


FAQ

How do you clean a projection vein finder?

You clean the device with a medical-grade disinfectant wipe. Make sure you wipe all surfaces. Avoid using water or harsh chemicals. Always clean the device before and after each use.

Can you use a projection vein finder on all skin tones?

Yes, you can use the device on any skin tone. Near-infrared light works well for dark and light skin. Adjust the brightness or color settings if needed.

What should you do if the veins are hard to see?

Try moving the device closer or farther from the skin. Ask the patient to squeeze their fist. Use a tourniquet to make veins stand out. Dim the room lights for better contrast.

Is the projection vein finder safe for children?

You can safely use the device for children. Nurses often use it for pediatric patients. The device does not touch the skin or cause pain.

Do you need special training to use a projection vein finder?

You do not need special training, but practice helps. Many clinics offer workshops or online lessons. You get better results when you know how to adjust the device and read the images.

How to Choose the Right Aluminum Truss Spigot vs. Bolt

spigot truss and bolt truss


Why Spigot vs. Bolt Truss Connections Define Stage Truss Performance

When choosing an aluminum truss system, you have to consider more than just its size or appearance. The truss connections play a decisive role in the performance and practical use of the entire structure. For most stage truss projects, the choice narrows to two primary systems: spigot truss and bolt truss. Both are designed to build reliable and professional stage structures, but each offers unique advantages that directly affect performance for specific event setups.


The Advantages of Spigot Trusses

Most people choose spigot trusses because they are quick and easy to install. Installers often prefer this connection system when time is critical, such as during a rushed exhibition, a trade show, or a temporary stage setup. The spigot truss connection allows for rapid assembly and disassembly, enabling large stage truss frames to be built or dismantled in a fraction of the time compared to bolts. This efficiency not only saves labor, but also reduces logistical challenges, especially when equipment must be transported to multiple venues within a short time. 


The Strength of Bolt Trusses

Bolt trusses, on the other hand, meet a completely different set of requirements. Large concerts, outdoor music festivals, and long-term stage constructions often require truss systems that can withstand heavy loads and unpredictable conditions. The bolt truss system creates a rigid frame that maintains its structural integrity under stress. It is exceptionally strong and durable, which is why professionals in the stage truss industry rely on it for projects involving heavy LED screens or exposure to harsh outdoor environments. Although installation takes more time, experienced event coordinators know that the extra effort results in maximum safety and long-term reliability. For heavy-duty or permanent aluminum stage truss setups, the bolt option provides unmatched stability.


Choosing Based on Event Requirements

In the end, the decision between spigot truss and bolt truss depends entirely on the event requirements. Short-term projects with frequent mobility benefit from the speed and convenience of spigot trusses, while long-term installations with demanding load capacities require the security of bolt connections. Asking practical questions—such as how many kilograms the truss must support, how long the structure needs to remain in place, and whether it will be used indoors or outdoors—helps determine the most suitable solution.


Selecting the Best Truss System for Reliable Events

Investing in an aluminum truss system means investing in safety, reliability, and efficiency. Choosing the wrong type of stage truss can lead to unnecessary costs or even safety risks. By understanding the distinct advantages of both spigot truss connections and bolt truss connections, event planners and stage designers can make informed decisions that ensure compliance with safety standards while also enhancing the success of their events. The right stage truss system provides peace of mind, delivering a structure that is stable, professional, and ready for performance.

How to Install LED Wall Ground Supports?

What is LED Wall Ground Support System?

The LED Wall Ground Support is a system used to support LED display screens. It is suitable for 500*500mm, 500*1000mm, 640*640mm, 640*480mm, 960*960mm and other specifications of LED panels.

1. Pre-Installation Preparation

  • Confirm the size and design of your LED screen wall (stacking/off-ground, straight screen/curved screen)

First, you need to confirm whether your LED wall needs to be used on the ground or off the ground. Then is your LED panel a straight screen panel or a curved screen panel? We have straight LED wall ground support, off-ground straight LED wall ground support, curved LED wall ground support, and curved off-ground LED wall ground support for you to choose from.


  • Check the Conditions of the Installation Site

Then you need to confirm whether the installation site is level, and and check for any uneven areas or soft ground. Different ground conditions will directly affect the stability of the LED screen wall structure. At the same time, it is also necessary to pay attention to whether there are potential risk factors such as slopes and drains at the site. For outdoor environments, weather changes must also be taken into account. By surveying the on-site conditions in advance, it can effectively reduce the installation risk and ensure the safety and stability of the structure during use.


  • Whether It Is Grassland, Sand or Uneven Ground

Grassland, sandy land or soft ground usually do not have sufficient load-bearing capacity. If the LED wall ground support is installed directly on such ground, it is very easy to tilt or even complete topple. Especially in situations where the wind is strong or people are frequently active, it will bring hidden dangers to on-site safety. Therefore, under such ground conditions, you must take additional reinforcement measures to use the LED wall ground support with a larger base. On suitable surfaces (such as concrete), use chemical bolts or expansion bolts to anchor the base directly. For sites that cannot meet the safety requirements, construction should be avoided.


  • Space Height and Span Limit

The spatial height refers to the clear space from the installation of the ground to the obstacles above (such as ceiling beams, suspended ceilings, lighting fixtures, fire pipes, ventilation pipes). Reserve sufficient safe operation space (it is usually recommended that the top of the screen be at least 0.8 meters below any obstacles) to facilitate panel lifting, personnel construction and post-maintenance. The span limitations refer to the distance between the sides of the screen and walls, columns or other fixtures. This determines whether the installation and transportation paths are unobstructed, and whether the screen panel can be positioned smoothly. At the same time, it is necessary to consider whether to reserve a repair channel behind the screen (it is recommended to be at least 0.8 meters wide)


  • Does Your Screen Panel Have A Quick Lock Hole?

Check with your screen panel suppliers to confirm whether the panels you purchased are equipped with quick lock holes. If they do have quick lock holes, you can provide us with the panel drawing. GF-Truss can customize the quick lock for your panel. If there is no quick lock hole, you can also use screw locks.


2. Choosing the Right LED Wall Support System

  • Selection of Support Structures Corresponding to Different Panels

For the straight screen panel, we have a straight LED wall ground support and off-ground LED wall ground support to choose from. For curved screen/OLED screen panel, we have curved LED wall ground support, off-ground curved LED wall ground support and flexible OLED screen panel ground support. Besides LED screen ground supports, hanging beams for LED panels are also available in GF-Truss.


  • Standard Solution vs Customized Solution

Standard solution: suitable for installation scenarios of common sizes (such as 5*3m straight LED wall ground support), standard curved, and regular height. The advantages are fast delivery and universal accessories.

Customized solution: a must in the following situations:

1. Special physical size: super-large area, special-shaped cutting, straight&arc matching.

2. Extreme load or span: beyond the safety range of the standard load table.

  • When Do You Need A Larger Base or A Heavier Counterweight?

When the LED wall is large and the overall height is high (more than 5m), or when it is used in outdoor and windy environments, it is usually necessary to configure a larger base, ballast or additional counterweights. This kind of structure can effectively improve the overall anti-overturning ability and reduce the risk of structural instability caused by external forces. Especially in sites with limited ground conditions or cannot be fixed, reasonable counterweight design is an important way to ensure safety.


Large Base with Ballast LED Wall Ground Support


3. Step-by-Step Installation Process

  • Step 1: Placement and Horizontal Adjustment of Ground Beam and Base

According to the LED wall size, place the ground beams in sequence. Connect the adjacent ground beams together, then attach the adjustable bases to the ground beams. Use a spirit level to check the overall level of the ground beams. Make fine adjustments to the adjustable bases and ground beams by adjustable feet to compensate for uneven areas to ensure the entire foundation structure is level and stable.

Ground beams and adjustable bases aligned and leveled during LED wall ground support installation


  • Step 2: Install the Ladder Trusses and the Crossbars

Install the first-layer ladder trusses on the base. According to the design height, install subsequent layers of ladder trusses sequentially. Connect the adjacent ladder trusses with the crossbars/telescopic crossbars to avoid structural shaking.

Installing ladder trusses and crossbars to form a stable LED wall support structure


  • Step 3: Install the LED Screen Panel

After installing the ladder trusses, then LED screen panels can be locked. First, use the panel lock on the ground beam to firmly lock the first layer of the panels. Then install the panel layer by layer from bottom to top, and pay attention to the alignment and flatness between the panels while installing.


  • Step 4: Use Screw Lock/Quick Lock to Lock the Panel

Connect the quick lock/screw lock to the ladder trusses first, and then lock the panels. After the panels are in place, lock the panels in turn. During locking, it is necessary to ensure that the connector is completely in place and tightened to prevent displacement or shaking of the panel during use.

Locking LED panels with quick locks and screw locks on ladder trusses


  • Step 5: Overall Structure Inspection and Reinforcement

After all the installations are completed, the whole structure will be comprehensively inspected, including the ground beams, adjustable bases, ladder trusses, crossbars and panel connection points. Confirm that all connectors have been tightened, and that the structure shows no significant movement or abnormalities. According to the on-site conditions and screen size, necessary reinforcement treatment should be carried out in key parts to ensure that the system remains safe and stable in long-term use or complex environments.


4. Common Installation Mistakes to Avoid

  • Ignoring Ground Conditions

Ground conditions are one of the key factors that affect the overall safety of LED screen ground support structures. If the structure is installed directly without fully assessing the levelness or stability of the ground, it is easy to cause uneven load distribution at the base. Once the ground is uneven, sloping, or prone to settling, the overall structure tends to tilt forward, which not only affects the stability of the screen, but also significantly increases the safety hazards. Therefore, the ground should be checked and treated as necessary before installation, with appropriate counterweights or additional stabilization measures applied as needed.


  • Skipping Leveling and Alignment

Failing to perform precise leveling of the ground beams and bases is another common but easily overlooked problem. If the foundation is not level, the error will be continuously amplified during assembly, which will directly affect the installation accuracy of the LED screen panel and module. There may be misalignment, uneven seams or local force between the panels. Therefore, professional tools must be used for precise level adjustment during the initial installation to provide a reliable foundation for the smooth installation.


5. Post-Installation Check & Maintenance

  • Safety Clearance Before Operation

A comprehensive safety confirmation is required before the system is put into use. This includes checking whether the LED screen panels are installed level and securely connected, whether any movement or displacement is present, and whether all safety locking devices are in an effective state.


  • Long-term Maintenance

For long-term use or high-frequency disassembly projects, it is recommended to formulate regular inspection and maintenance plans. Focus should be placed on the base support structure, connectors and high-frequency force-bearing parts, with timely tightening, adjustment, or replacement of worn components as needed. Before each transition or repeated installation, re-leveling and structural inspection can help reduce the risk of structural fatigue, extend the service life, and ensure long-term stability and safe operation.


6. Why Choose GF-Truss

  • Rich Experience in LED Wall Ground Support

GF-Truss has been deeply engaged in the field of aluminum alloy trusses and LED wall ground support for many years, and has accumulated a lot of practical project experience, covering a variety of application scenarios such as indoor exhibitions, outdoor performances, sports events, business press conferences and touring projects. GF-Truss is also a long-term partner of China's LED display manufacturers. Our design team delivers more than 2,300 customized solutions to customers every year. By participating in a wide range of LED wall projects of different sizes, heights and installation methods, we have an in-depth understanding of structural load behavior, installation process and on-site risks. This can effectively avoid potential problems and provide a more reliable support basis for your projects.


Customized LED Wall Support Solutions and Technical Support


  • Customized LED Wall Support Solutions and Technical Support

GF-Truss can provide flexible customized solutions for different site conditions, various screen sizes and application requirements. Our technical team will engage in the project and work closely with customers and event organizers. We conduct a comprehensive assessment of key factors such as venue dimensions, ground conditions and ceiling structure. Based on detailed on-site information, we will provide a full range of professional suggestions and feasibility plans from structure selection, size configuration, connection design.


  • Suitable for A Variety of Scenarios and Applications

GF-Truss's LED wall ground support solutions are highly versatile, modular and expandable. They can widely adapt to a variety of activity scenarios and long-term application needs. For temporary events, such as music festivals, product launches and commercial exhibitions, our system has the core advantages of rapid disassembly, efficient transportation and flexible reorganization, which can adapt to tight scheduling and frequent venue changes. For long-term fixed installations, such as theaters, gymnasiums and studios, we focus on the extreme stability and durability of the structure to provide lasting and reliable support. For the most challenging high-frequency tour projects, the system is strengthened in terms of durability, standardization and rapid deployment to ensure the stability of the performance effect, while greatly reducing logistics and manpower costs.


7. Get Professional Support

Whether you are developing an initial concept, comparing solutions, or finalizing a detailed design, GF-Truss is always ready to support your project. We invite you to share your project blueprint, site parameters and creative ideas, allowing our professional structural designers to provide you with in-depth preliminary analysis and tailor-made technical advice. From the initial concept to the final implementation, we will be your reliable technical partner.


Based on the specific needs you provide, our design team will conduct detailed structural calculation and simulation analysis to develop a professional, customized structural solution, accompanied by a clear and transparent project quote. We promise that each plan has been rigorously checked for safety, and each quotation is meticulous and reasonable to ensure that you get comprehensive and accurate information before making a decision.

 GF-Truss customized LED wall support solutions with professional design and technical support


Start your exclusive project consultation now! You can contact us through WhatsApp and email to get free technical solutions and accurate quotations.